
- 1. 주요 동작
1. 모든 요청은 MainController에서 처리함
2. 프로젝트 시작하면 index.jsp 출력
import org.springframework.stereotype.Controller;
import org.springframework.web.bind.annotation.GetMapping;

@Controller
public class MainController {
    @GetMapping("/")
    public String index(){
        return "index";
    }
}
- 2. index.jsp
1. monday1.jsp를 출력하기 위한 링크 있음(요청주소: /monday1)
2. monday2.jsp를 출력하기 위한 버튼 있음(요청주소: /monday2)
3. monday3.jsp를 출력하기 위한 버튼 있음(요청주소: /monday3)
4. monday4.jsp를 출력하기 위한 버튼 있음(요청주소: /monday4)


1번을 제외하면 2,3,4는 버튼이기 때문에 함수를 호출하여 주소를 리턴합니다
- 3. monday1.jsp
1. 링크사용 monday1-param 주소로 month, day 파라미터를 get 방식으로 요청함
a. js 함수 활용

2. 컨트롤러에서는 month, day 파라미터 값을 System.out으로 출력함
import org.springframework.stereotype.Controller;
import org.springframework.web.bind.annotation.GetMapping;
import org.springframework.web.bind.annotation.RequestParam;

@Controller
public class MainController {
    @GetMapping("/monday1")
    public String monday1(){
        return "monday1";
    }
monday1.jsp를 화면에 보여주기 위한 GetMapping 메소드

    @GetMapping("/monday1-param")
    public String monday1_param(@RequestParam("month") String month ,
    				@RequestParam("day") String day ){
    파라미터로 받은 정보를 @RequestParam를 이용하여 각각의 String 변수에 담아줌

        System.out.println("month = " + month + ", day = " + day);
        이후 출력문을 사용하여 출력함(soutp 자동 완성 사용)

        return "monday1";
        이후 화면은 monday1.jsp를 보여줌
    }

}
- 4. monday2.jsp
1. form 태그를 활용하여 monday2-param 주소로
이름(name), 전화번호(mobile) 정보를 get 방식으로 요청함

2. 컨트롤러에서는 파라미터 값을 model에 각각 담아서 result2.jsp에 출력함

${name} 이런 양식을 영어로는 String interpolation이라고 하고
한국어로는 문자열 보간이라고 한다
문자열 보간을 이용하여 Model인터페이스로 받은 속성값을 화면에 출력해준다
import org.springframework.stereotype.Controller;
import org.springframework.web.bind.annotation.GetMapping;
import org.springframework.web.bind.annotation.RequestParam;

@Controller
public class MainController {
    @GetMapping("/monday2")
    public String monday2(){
        return "monday2";
    }
monday2.jsp를 화면에 보여주기 위해
return을 monday2로해주는 GetMapping

    @GetMapping("/monday2-param")
    public String monday2_param(Model model,
    				@RequestParam("name") String name,
                		@RequestParam("mobile") String mobile){
	사용자가 입력한 값을 파라미터로 전송받고,
    전송받은 파라미터를 @RequestParam으로 정보를 꺼내왔다

        model.addAttribute("name",name);
        model.addAttribute("mobile",mobile);
        이후 Model 인터페이스를 이용해 해당 꺼내온 정보를
        Model 객체에 담아주고 result2.jsp를 보여주기 위해 result2를 리턴
        return "result2";
    }
}
- 5. monday3.jsp
1. form 태그를 활용하여 monday3-param 주소로
이메일(email) , 비밀번호(password) 정보를 post 방식으로 요청함

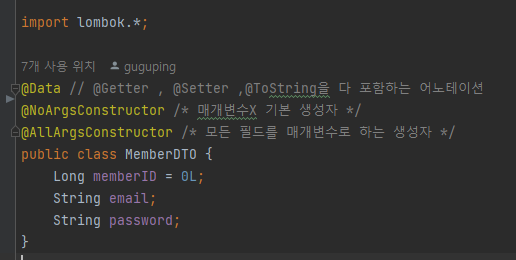
2. 컨트롤러에서는 파라미터 값을 MemberDTO객체
필드값으로 담아서 result3.jsp에 출력함

import org.springframework.stereotype.Controller;
import org.springframework.web.bind.annotation.PostMapping;
import org.springframework.web.bind.annotation.GetMapping;
import org.springframework.web.bind.annotation.ModelAttribute;
import org.springframework.ui.Model;

@Controller
public class MainController {
    @GetMapping("/monday3")
    public String monday3(){
        return "monday3";
    }
monday3.jsp를 화면에 보여주기 위해
return을 monday3로해주는 GetMapping

    @PostMapping("/monday3-param")
    public String mondy3Param(@ModelAttribute MemberDTO memberDTO , Model model){

     매개변수에 ModelAttribute로 파라미터로 받은 값을 바로 넣을 수 있다
     하지만 전송받는 파라미터의 name과 DTO의 필드 이름이 같아야한다

        model.addAttribute("email",memberDTO.getEmail());
        model.addAttribute("password",memberDTO.getPassword());
        그외로 한번에 출력하는 것이 아닌
        따로 출력하기 위해서는 이렇게 따로 받아주는 작업이 필요하다

        return "result3";
        result3.jsp에 띄울것이기 때문에 reuturn을 result3로 보낸모습
    }
}
- 6. monday4.jsp
1. 컨트롤러에서 10명의 회원 정보 (이메일,비밀번호만)를 만들어서
memberDTOList에 담고 model에 담은 뒤 monday4.jsp에 표 형태로 출력

forEach문을 사용하는 c태그는 롬북이기 때문에 롬북 태그가 필요하다
자동완성을 사용하면 임폴트처럼 자동으로 생성되지만 안된다면 아래를 복사 붙여넣기하자
<%@ taglib prefix="c" uri="http://java.sun.com/jsp/jstl/core" %>
Controller
import org.springframework.stereotype.Controller;
import org.springframework.web.bind.annotation.GetMapping;

@Controller
public class MainController {
    private List<MemberDTO> newMemberDTO(){
        List<MemberDTO> memberList = new ArrayList<>();
        for (int i=1; i<=10; i++) {
            MemberDTO memberDTO = new MemberDTO();
            memberDTO.setMemberID((long) i);
            memberDTO.setEmail("이메일" + i);
            memberDTO.setPassword("비밀번호" + i);
            memberList.add(memberDTO);
        }
        return memberList;
    }
    정해진 멤버의 정보를 담는것이 아니기 때문에
    따로 메소드를 만들어 쉽게 담아주었습니다
    객체의 정보를 ArrayList에 담아주고 리턴합니다

    @GetMapping("/monday4")
    public String monday4(Model model){
        List<MemberDTO> newList = newMemberDTO();
        model.addAttribute("mList",newList);
        위의 메소드를 생성자로 사용하여 newList에 담아줍니다
        Modle 인터페이스를 이용하여 담아 출력합니다

        model.addAttribute("mList",newMemberDTO());
        애초에 ArrayList를 따로 받지 않고
        이렇게 Model인터페이스에 속성값으로 바로 담아
        사용하는 방법도 있습니다

        return "monday4";
    }
}'나의 수업일지' 카테고리의 다른 글
- 1. 주요 동작
1. 모든 요청은 MainController에서 처리함
2. 프로젝트 시작하면 index.jsp 출력
import org.springframework.stereotype.Controller;
import org.springframework.web.bind.annotation.GetMapping;

@Controller
public class MainController {
    @GetMapping("/")
    public String index(){
        return "index";
    }
}
- 2. index.jsp
1. monday1.jsp를 출력하기 위한 링크 있음(요청주소: /monday1)
2. monday2.jsp를 출력하기 위한 버튼 있음(요청주소: /monday2)
3. monday3.jsp를 출력하기 위한 버튼 있음(요청주소: /monday3)
4. monday4.jsp를 출력하기 위한 버튼 있음(요청주소: /monday4)
1번을 제외하면 2,3,4는 버튼이기 때문에 함수를 호출하여 주소를 리턴합니다
- 3. monday1.jsp
1. 링크사용 monday1-param 주소로 month, day 파라미터를 get 방식으로 요청함
a. js 함수 활용
2. 컨트롤러에서는 month, day 파라미터 값을 System.out으로 출력함
import org.springframework.stereotype.Controller;
import org.springframework.web.bind.annotation.GetMapping;
import org.springframework.web.bind.annotation.RequestParam;

@Controller
public class MainController {
    @GetMapping("/monday1")
    public String monday1(){
        return "monday1";
    }
monday1.jsp를 화면에 보여주기 위한 GetMapping 메소드

    @GetMapping("/monday1-param")
    public String monday1_param(@RequestParam("month") String month ,
    				@RequestParam("day") String day ){
    파라미터로 받은 정보를 @RequestParam를 이용하여 각각의 String 변수에 담아줌

        System.out.println("month = " + month + ", day = " + day);
        이후 출력문을 사용하여 출력함(soutp 자동 완성 사용)

        return "monday1";
        이후 화면은 monday1.jsp를 보여줌
    }

}
- 4. monday2.jsp
1. form 태그를 활용하여 monday2-param 주소로
이름(name), 전화번호(mobile) 정보를 get 방식으로 요청함
2. 컨트롤러에서는 파라미터 값을 model에 각각 담아서 result2.jsp에 출력함
${name} 이런 양식을 영어로는 String interpolation이라고 하고
한국어로는 문자열 보간이라고 한다
문자열 보간을 이용하여 Model인터페이스로 받은 속성값을 화면에 출력해준다
import org.springframework.stereotype.Controller;
import org.springframework.web.bind.annotation.GetMapping;
import org.springframework.web.bind.annotation.RequestParam;

@Controller
public class MainController {
    @GetMapping("/monday2")
    public String monday2(){
        return "monday2";
    }
monday2.jsp를 화면에 보여주기 위해
return을 monday2로해주는 GetMapping

    @GetMapping("/monday2-param")
    public String monday2_param(Model model,
    				@RequestParam("name") String name,
                		@RequestParam("mobile") String mobile){
	사용자가 입력한 값을 파라미터로 전송받고,
    전송받은 파라미터를 @RequestParam으로 정보를 꺼내왔다

        model.addAttribute("name",name);
        model.addAttribute("mobile",mobile);
        이후 Model 인터페이스를 이용해 해당 꺼내온 정보를
        Model 객체에 담아주고 result2.jsp를 보여주기 위해 result2를 리턴
        return "result2";
    }
}
- 5. monday3.jsp
1. form 태그를 활용하여 monday3-param 주소로
이메일(email) , 비밀번호(password) 정보를 post 방식으로 요청함
2. 컨트롤러에서는 파라미터 값을 MemberDTO객체
필드값으로 담아서 result3.jsp에 출력함
import org.springframework.stereotype.Controller;
import org.springframework.web.bind.annotation.PostMapping;
import org.springframework.web.bind.annotation.GetMapping;
import org.springframework.web.bind.annotation.ModelAttribute;
import org.springframework.ui.Model;

@Controller
public class MainController {
    @GetMapping("/monday3")
    public String monday3(){
        return "monday3";
    }
monday3.jsp를 화면에 보여주기 위해
return을 monday3로해주는 GetMapping

    @PostMapping("/monday3-param")
    public String mondy3Param(@ModelAttribute MemberDTO memberDTO , Model model){

     매개변수에 ModelAttribute로 파라미터로 받은 값을 바로 넣을 수 있다
     하지만 전송받는 파라미터의 name과 DTO의 필드 이름이 같아야한다

        model.addAttribute("email",memberDTO.getEmail());
        model.addAttribute("password",memberDTO.getPassword());
        그외로 한번에 출력하는 것이 아닌
        따로 출력하기 위해서는 이렇게 따로 받아주는 작업이 필요하다

        return "result3";
        result3.jsp에 띄울것이기 때문에 reuturn을 result3로 보낸모습
    }
}
- 6. monday4.jsp
1. 컨트롤러에서 10명의 회원 정보 (이메일,비밀번호만)를 만들어서
memberDTOList에 담고 model에 담은 뒤 monday4.jsp에 표 형태로 출력
forEach문을 사용하는 c태그는 롬북이기 때문에 롬북 태그가 필요하다
자동완성을 사용하면 임폴트처럼 자동으로 생성되지만 안된다면 아래를 복사 붙여넣기하자
<%@ taglib prefix="c" uri="http://java.sun.com/jsp/jstl/core" %>
Controller
import org.springframework.stereotype.Controller;
import org.springframework.web.bind.annotation.GetMapping;

@Controller
public class MainController {
    private List<MemberDTO> newMemberDTO(){
        List<MemberDTO> memberList = new ArrayList<>();
        for (int i=1; i<=10; i++) {
            MemberDTO memberDTO = new MemberDTO();
            memberDTO.setMemberID((long) i);
            memberDTO.setEmail("이메일" + i);
            memberDTO.setPassword("비밀번호" + i);
            memberList.add(memberDTO);
        }
        return memberList;
    }
    정해진 멤버의 정보를 담는것이 아니기 때문에
    따로 메소드를 만들어 쉽게 담아주었습니다
    객체의 정보를 ArrayList에 담아주고 리턴합니다

    @GetMapping("/monday4")
    public String monday4(Model model){
        List<MemberDTO> newList = newMemberDTO();
        model.addAttribute("mList",newList);
        위의 메소드를 생성자로 사용하여 newList에 담아줍니다
        Modle 인터페이스를 이용하여 담아 출력합니다

        model.addAttribute("mList",newMemberDTO());
        애초에 ArrayList를 따로 받지 않고
        이렇게 Model인터페이스에 속성값으로 바로 담아
        사용하는 방법도 있습니다

        return "monday4";
    }
}